

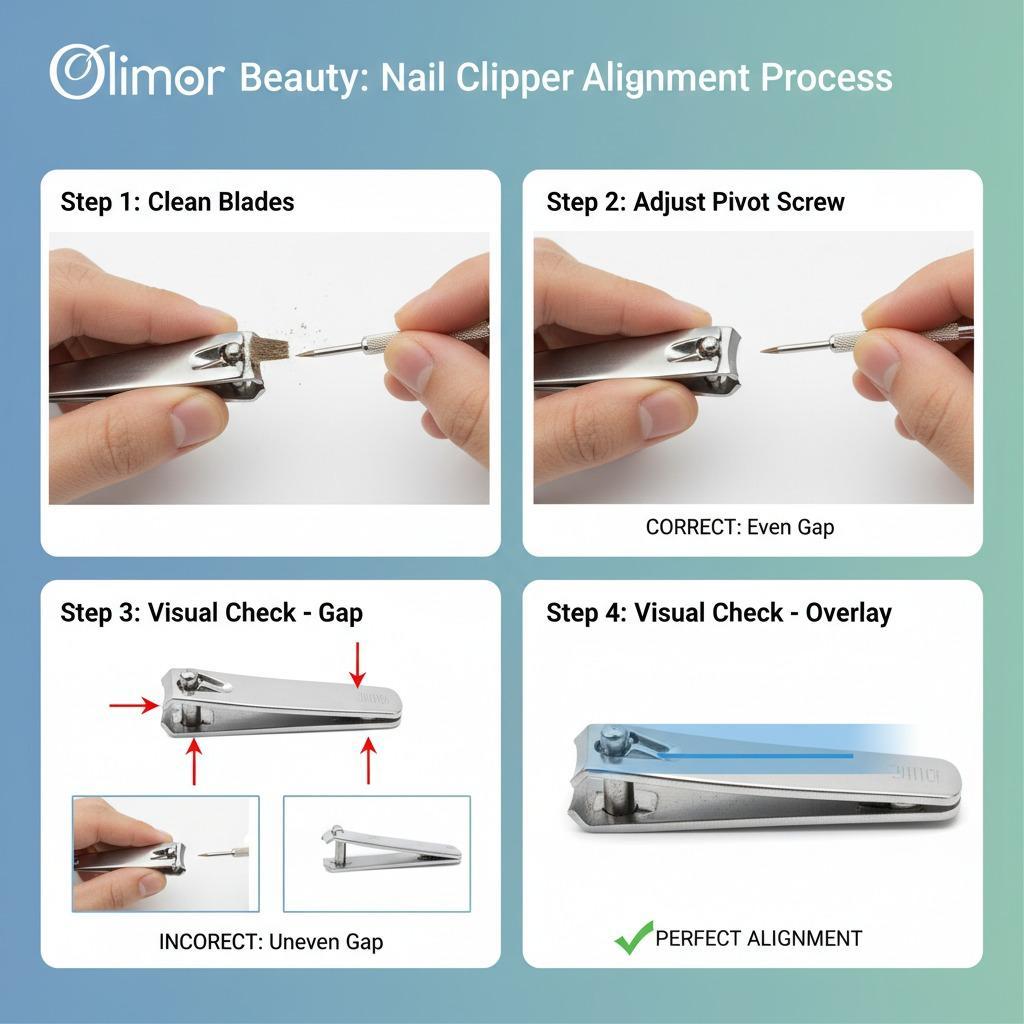
Nail Clipper Blade Alignment: How to Inspect, Use and Source a Cleaner-Cutting Clipper
Nail clipper blade alignment is the way the upper and lower cutting edges meet when the lever is pressed. When the edges close evenly, the clipper can trim with less crushing, fewer repeated cuts and a smoother nail edge. When the edges are offset, blocked by debris, loose at the pivot or unevenly tensioned, the nail may bend, split or tear before it is cut.
For home users, alignment affects everyday comfort. For salons, retailers, distributors and private-label beauty buyers, it is also a visible quality point that customers notice quickly. A nail clipper may look polished in packaging, but if the blades do not meet correctly, the user experience will feel poor. This guide explains how alignment works, how to check it, how to maintain it and how to evaluate stainless steel nail clippers when comparing beauty tool products for retail or professional use.
What Nail Clipper Blade Alignment Means
Blade alignment describes the contact between the two cutting edges. On a well-aligned nail clipper, the edges close in a controlled line. The tips should not cross too far, meet only at one corner or leave a visible gap when the lever is fully pressed. Alignment depends on several parts working together: the blade geometry, pivot, pin or screw area, lever, body shape and overall assembly fit.
Alignment is not the same as sharpness. A sharp edge can still cut badly if the two blades do not meet properly. A clipper can also look aligned but perform poorly if the cutting edge is dull, the lever flexes too much or the pivot feels unstable. The best cutting feel comes from three factors working together: suitable edge sharpness, even blade meeting and a stable body that transfers pressure cleanly.
Stainless steel nail clippers are widely used because the material is suitable for durable grooming tools and regular nail care. However, material alone does not guarantee a clean cut. Buyers should inspect fit, finishing, lever movement and the blade meeting line instead of judging only by weight or surface shine. When comparing items across a nail and beauty tool collection, blade alignment is one of the most practical checks because it can be evaluated visually and by hand before deeper review.
Why Poor Alignment Causes Rough or Uncomfortable Cuts
Misalignment usually appears as small frustrations during trimming. The user may need to press harder, cut the same area more than once or file heavily afterward. On thicker toenails, the problem becomes more noticeable because the nail creates more resistance and exposes weakness in the blade contact point.
Common signs of alignment problems include:
- Uneven nail edges: one side of the blade cuts first, leaving a jagged or stepped finish.
- Nail bending before cutting: the blades press the nail instead of slicing through it cleanly.
- Repeated clipping: a nail section remains attached after one full press.
- Side slipping: the cutting edge pushes the nail away from the intended line.
- Excessive pressure: normal fingernails require more force than expected.
- Visible blade gap: light can be seen between the cutting edges when closed.
- Harsh lever feel: the handle feels gritty, loose or unstable during pressing.
These issues reduce comfort and can also shorten the useful life of the tool. If users compensate by pressing harder, the lever and pivot take more stress. For commercial buyers, poor alignment can lead to returns, negative product reviews and weak repeat purchase. For salons and spas, inconsistent cutting slows service and can affect the client’s impression of hygiene and professionalism.
Quick Inspection Routine Before Using a Nail Clipper
A simple inspection can prevent many poor cuts. This is useful for personal clippers, travel clippers, shared household tools and salon tools that are used frequently. The goal is to confirm that the cutting area is clean, the lever moves smoothly and the blades meet evenly before trimming.
- Clean the blade opening. Remove nail fragments, dust, lotion residue or visible debris. A small particle can interrupt contact between the two cutting edges.
- Close the clipper slowly. Watch how the upper and lower edges meet. They should close evenly rather than twist to one side.
- Check from the front. Look for a clear left-right offset. Minor variation may exist, but a severe side shift can affect cutting control.
- Look for a gap. When the lever is pressed, the cutting edges should not leave an obvious open space along the cutting line.
- Feel the lever action. A smooth, controlled press is preferable. A gritty, loose or unstable feel can indicate debris, wear or poor assembly.
- Test a small nail edge first. Do not start with a deep cut. A narrow test cut helps confirm control before trimming more nail.
If the clipper has an adjustable screw, a very small adjustment may improve the meeting point. Do not overtighten it. Too much tension can make the lever hard to press and may increase wear. Many nail clippers are not designed for user adjustment, so forcing the pivot or bending the body can damage the tool. If the edge is chipped, the body is bent or the lever no longer applies pressure evenly, replacement is usually the safer choice.
How to Use an Aligned Clipper for a Cleaner Nail Edge
Even a well-made nail clipper needs proper technique. Cutting too much nail at once increases pressure on the blades and can leave a rough edge. For fingernails, several small cuts following the natural curve usually give better control than one deep cut across the full width.
Hold the clipper so the blade is close to perpendicular to the nail edge being trimmed. If the clipper is sharply angled, one blade corner may bite first and create a result that feels like misalignment. Use steady pressure rather than a fast snap. After trimming, use a nail file to smooth corners instead of repeatedly clipping tiny uneven sections.
Toenails often require a larger or stronger clipper than fingernails. If a compact fingernail clipper is used on a thick toenail, the blades may feel misaligned because the tool is being overloaded. Choosing the correct clipper size for the task is part of achieving a good result. Retail buyers should consider whether their assortment needs compact travel clippers, standard fingernail clippers, wider toenail clippers or ergonomic options for users who prefer a larger grip.
Cleaning and Maintenance That Help Preserve Alignment
Alignment can appear to change when the blade area becomes clogged or the pivot loses smooth movement. Regular cleaning is simple and helps preserve the cutting feel of stainless steel clippers. After use, tap out nail fragments and wipe the cutting area with a dry cloth. A small brush can help clear debris where the two edges meet.
If moisture is used during cleaning, dry the clipper thoroughly before storage. Stainless steel is selected for beauty tools because it suits regular grooming use, but dry storage is still a sensible habit. Avoid keeping clippers in sealed wet bags, shower areas or places where residue from cosmetics, disinfectants or cleaning products can collect around the pivot.
A very small amount of suitable lubricant at the pivot may help lever movement, but heavy application should be avoided. Excess oil can attract dust and nail particles, which may interfere with smooth closing. Wipe away surplus lubricant before storing the tool. For salon environments, cleaning and hygiene practices should follow local rules and the disinfectant manufacturer’s instructions. Public bodies such as the U.S. Food and Drug Administration and the European Commission publish consumer and product-safety information that may be relevant to beauty tools in some markets; buyers should verify current requirements and supplier documents for their destination market.
Selection Checklist for Retailers, Salons and B2B Buyers
For commercial sourcing, nail clipper blade alignment should be part of sample review before an order is placed. A clipper is a small item, but it combines cutting geometry, finishing, ergonomics, packaging protection and repeat-use performance. The checklist below helps buyers compare samples in a practical way.
| Evaluation point | What to check | Why it matters |
|---|---|---|
| Blade meeting line | Edges close evenly, with no obvious gap, severe crossing or one-sided contact. | Supports cleaner trimming and reduces repeated clipping. |
| Lever stability | Press feels controlled, not wobbly, gritty or loose. | Improves user confidence and cutting accuracy. |
| Cutting edge finish | Edge appears smooth and consistent along the cutting line. | Helps reduce snagging, crushing and uneven nail edges. |
| Body comfort | Shape and size suit the intended user group and nail type. | Helps users control angle and pressure. |
| Pivot area | Pin or screw area feels secure and allows smooth movement. | Affects force transfer and long-term usability. |
| Surface finishing | Edges, corners and handle surfaces feel comfortable to touch. | Improves perceived quality and handling comfort. |
| Packaging protection | Blade area is protected from impact, rubbing or deformation during transport. | Helps preserve alignment before retail sale. |
| Batch consistency | Multiple samples show similar closing feel and blade contact. | Reduces the risk of inconsistent customer experience. |
For sample inspection, buyers may use internal acceptance procedures or recognized sampling concepts such as ISO 2859 for inspection by attributes where appropriate. This does not replace supplier agreements or market-specific compliance review. Always verify the current version of any standard and request applicable supplier documents for the product, packaging and destination market.
Cost Factors and Specification Choices
The cost of a nail clipper is influenced by more than material. Buyers should consider the intended use, finish, packaging and inspection expectations. A compact promotional clipper, a retail-ready stainless steel clipper and a salon-oriented toenail clipper may require different levels of finishing, leverage and packaging protection.
Important cost and specification factors include:
- Clipper size and jaw style: toenail clippers may require a wider opening or stronger leverage than small fingernail clippers.
- Material and finishing: stainless steel construction, surface polishing and edge finishing affect both appearance and user feel.
- Assembly precision: pivot fit, lever contact and blade alignment consistency require careful manufacturing control.
- Packaging format: bulk packing, retail cards, gift sets and private-label packaging have different handling and presentation requirements.
- Customization: logo, color treatment, packaging artwork or set configuration can affect preparation steps and commercial planning.
- Inspection expectations: stricter sample review, batch inspection or packaging checks may require more coordination with the supplier.
Commercial buyers should avoid selecting only the lowest visible price if the product will represent a brand or be used in a professional kit. A small difference in assembly fit or finishing can strongly affect customer perception. The best sourcing discussion starts with application: who will use the clipper, which nail type it should handle, how it will be packaged and what quality checks are important.
How to Evaluate a Nail Clipper Supplier
A capable supplier should be able to discuss the product beyond appearance. Ask how samples are checked, how the blade meeting line is reviewed, how packaging protects the cutting area and what customization options are realistic for the target order. Avoid vague claims that cannot be supported with product samples, specifications or inspection documents.
Useful supplier questions include:
- Can the supplier provide samples for checking blade alignment, lever feel and finishing?
- What product details can be customized, such as logo placement, packaging or set combination?
- How is the cutting area protected during packing and shipment?
- What inspection documents, product information or compliance materials are available for the destination market?
- How should the buyer communicate target users, retail channel and packaging expectations?
When preparing an order discussion, include your product use case, preferred clipper type, packaging direction and any inspection requirements. If you are comparing nail care tools for retail, salon kits or promotional programs, you can send a sourcing inquiry with your target market and product expectations so the review begins with practical requirements instead of generic catalog browsing.
When to Replace a Nail Clipper
Cleaning and careful use can solve minor debris and movement issues, but they cannot correct every alignment problem. Replace a clipper if the cutting edges are chipped, the body is bent, the lever no longer applies pressure evenly or the blades continue to tear nails after cleaning. A poor cut often causes users to press harder, which can worsen the experience and may create more nail damage.
For salons and other professional environments, replacement planning should be part of tool management. Frequently used clippers should be inspected regularly for blade contact, lever movement and surface condition. For retailers and brand owners, sample evaluation should include repeated handling and test cuts rather than only checking a new item in its package. A clipper that maintains a consistent closing feel after normal use is more likely to satisfy customers over time.
Choosing Olimor Beauty Nail Care Tools
Olimor Beauty supplies beauty tools for practical grooming needs, including nail clipper products. When evaluating a clipper, focus on the details that shape daily performance: stainless steel construction, comfortable handling, a clean blade meeting line, stable pivot movement and packaging that helps protect the tool before use. These features work together to make trimming more controlled and predictable.
If you are sourcing for a store, salon kit, travel set or beauty accessory range, start with the user problem you need to solve. Is the priority portability, easy home grooming, toenail strength, private-label packaging or a coordinated nail care set? Clear requirements make it easier to compare samples and avoid choosing by surface finish alone. To discuss suitable nail care tools or broader beauty tool options, contact Olimor Beauty with your application, market and preferred product direction.
FAQ
Can I request samples to check nail clipper blade alignment?
Yes. Samples are the best way to evaluate the blade meeting line, lever feel, body comfort and packaging protection before making a commercial decision. Share the intended market and use case so the sample discussion is relevant.
Is there a fixed MOQ for customized nail clippers?
MOQ depends on the product style, customization method, packaging and order requirements. Confirm the current MOQ with the supplier before planning artwork, launch timing or retail pricing.
Can nail clippers be customized with logo or packaging?
Customization may be available for elements such as logo placement, packaging artwork or set configuration, depending on the selected product and production requirements. Buyers should confirm feasibility with samples and supplier documents.
How should quality be checked before ordering?
Review samples for blade alignment, cutting feel, lever stability, surface finishing and packaging protection. For larger orders, agree on inspection points and documentation before production rather than after shipment.
What affects lead time for nail clipper orders?
Lead time can be affected by product selection, customization, packaging, sample approval and order volume. Confirm the current schedule with the supplier for the specific item and destination market.
Tag: