Eyelash Curler Anatomy: Features, Selection and Safe Use
An eyelash curler looks simple, but small differences in its shape, pad, hinge and handle can change how comfortable it feels and how evenly it lifts the lashes. For beauty buyers, salon users and daily makeup wearers, the goal is not just a dramatic curl. The better goal is a clean, controlled lift that does not pinch the lid, crease the lashes or force you to repeat pressure several times.
This guide explains the working parts of an eyelash curler, which features matter most, how to match a curler to different eye shapes, and what to review when comparing beauty tool suppliers. Olimor Beauty focuses on practical beauty tools, and this article is written to help you judge eyelash curlers with the same practical mindset: fit, comfort, repeatability, finish and maintenance.
What an Eyelash Curler Is Designed to Do
An eyelash curler bends the natural lash line upward by pressing lashes between a curved upper frame and a soft pad. A good curl should look lifted from the base, not sharply folded in the middle. The tool should open wide enough to position the lashes, close smoothly enough to control pressure, and release cleanly without pulling.
The best result usually comes before mascara, because dry, bare lashes move more freely and are less likely to stick to the pad. Some users add mascara after curling to darken and hold the shape. If a heated eyelash curler option is being considered, it should be evaluated with extra attention to temperature control, user instructions and comfort, because heat near the eye area requires careful handling.
Eyelash Curler Anatomy: Parts That Affect Performance
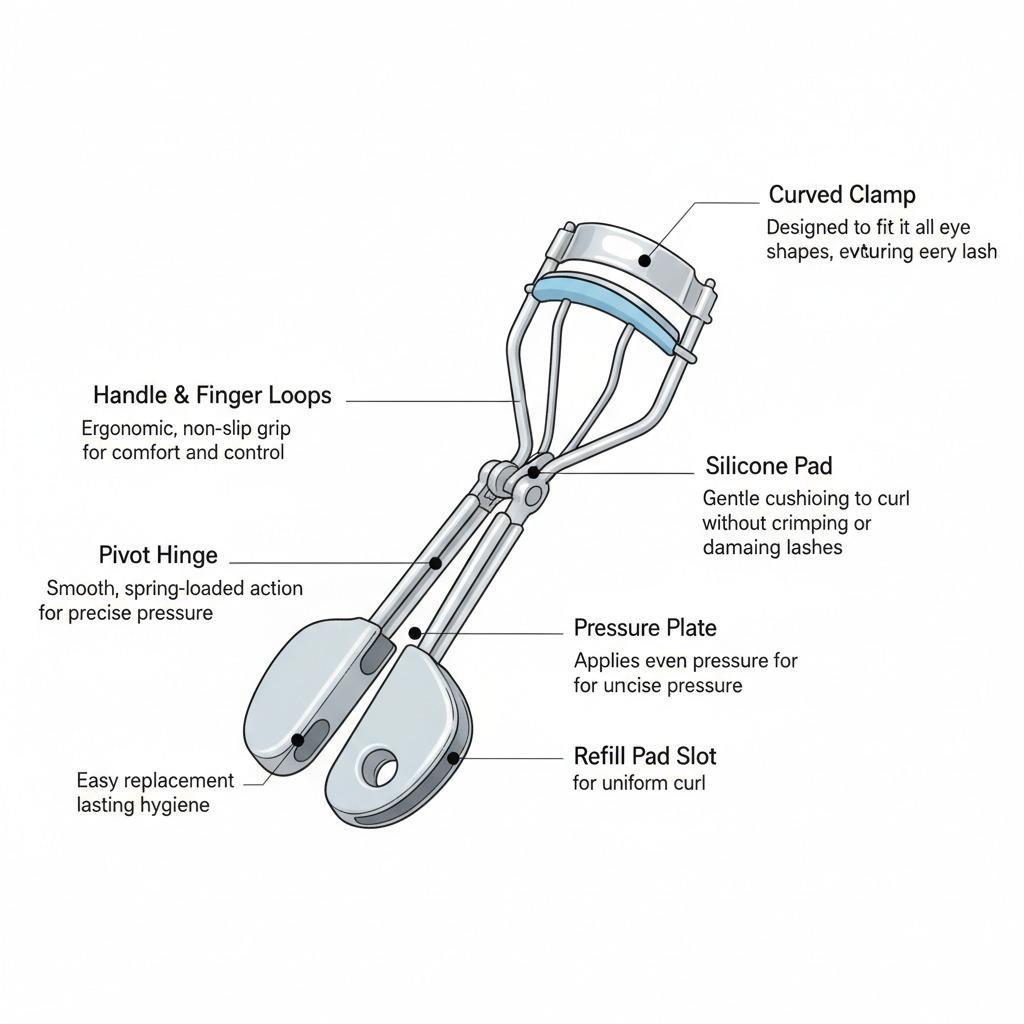
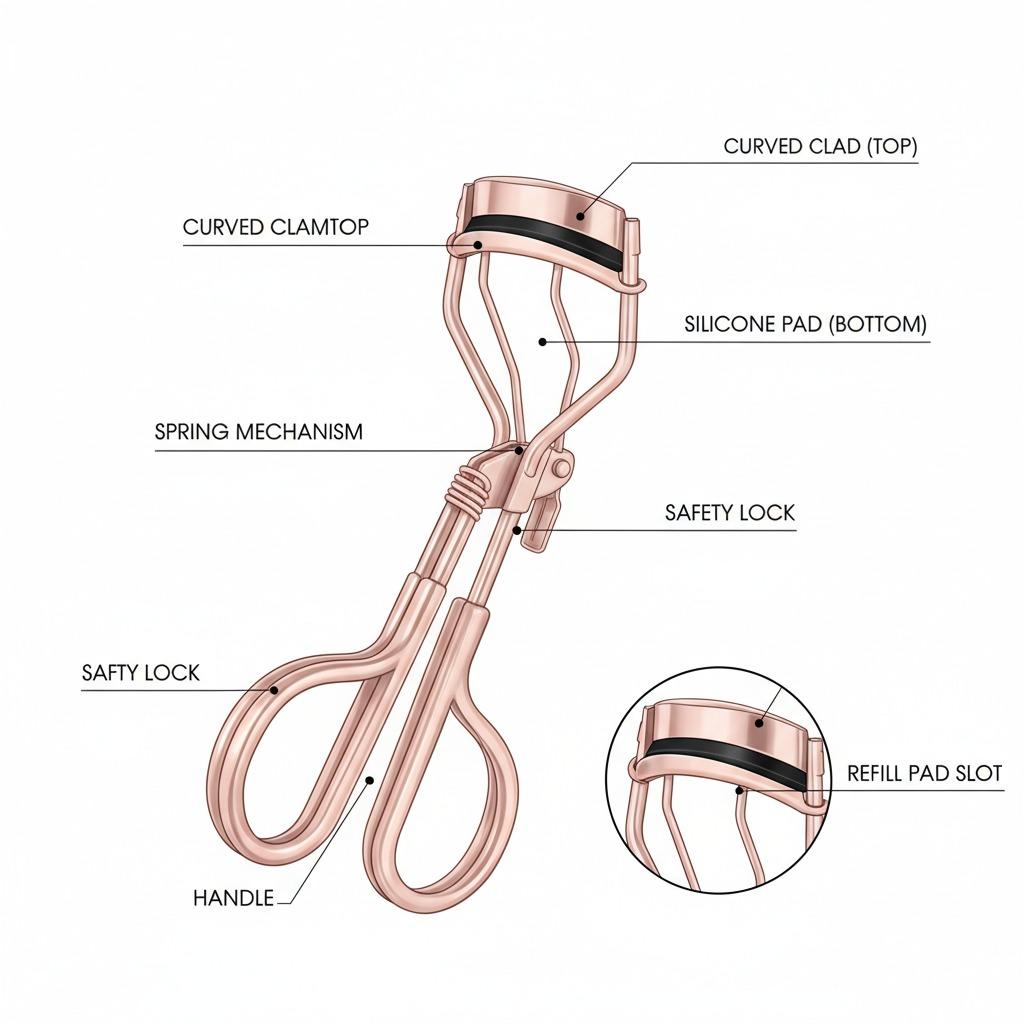
Understanding eyelash curler anatomy makes it easier to choose a tool that feels precise instead of intimidating. Most standard clamp-style curlers include these key components:
- Upper curved frame: This metal curve determines how the tool meets the eyelid. A curve that is too flat or too deep for the user can leave the inner or outer lashes less curled.
- Lower clamp channel: The lower part holds the pad and supports the lashes while pressure is applied. It should align cleanly with the upper frame.
- Silicone or soft cushion pad: The pad protects lashes from direct hard pressure. A resilient pad helps produce a rounded curl rather than a sharp crimp.
- Handle: The handle controls grip and pressure. An ergonomic design can help users apply steady force without shaking or squeezing too hard.
- Hinge or spring mechanism: The opening and closing action should feel smooth. Spring-loaded mechanisms, where included, can make release easier for some users.
- Body material and finish: Stainless steel construction is commonly valued for durability and easy cleaning. Edges should be smooth, with no rough points near the eye area.
When comparing options across beauty tool products, do not judge only by appearance. The most important quality is how the frame, pad and hinge work together under controlled pressure.
Choosing a Curler for Eye Shape and Lash Type
No eyelash curler fits every person perfectly. Eye shape, lash direction and lash length all matter. A buyer selecting tools for retail, kits or salon use should think about the end user rather than choosing only the most eye-catching finish.
For rounder eyes, a more pronounced frame curve may help reach the lash line without pressing uncomfortably at the center. For flatter or wider eye shapes, a less dramatic curve may make better contact across the lid. Users with short lashes often need a tool that can get close to the base without pinching, while long lashes may benefit from a broader clamp area and a pad that supports the lash length evenly.
Downward-growing lashes may need a firmer, carefully controlled press at the base, followed by a lighter press through the middle of the lash. Fine or fragile lashes should be curled with less pressure and with close attention to pad condition. A worn pad can create uneven pressure, which increases the risk of creasing or breakage.
Feature Checklist for Comparing Eyelash Curlers
When reviewing an eyelash curler for personal use, wholesale sourcing or inclusion in a product line, use a structured checklist. This prevents the decision from being based only on color, packaging or trend appeal.
| Feature | Why it matters | What to check |
|---|---|---|
| Frame curve | Affects contact with the lash line | Look for a curve that matches the intended user group and does not press hard into the lid. |
| Pad material | Controls pressure and lash protection | Check that the pad feels resilient, sits securely and is not too hard. |
| Hinge action | Influences control and comfort | Open and close the tool repeatedly to feel for wobble, stiffness or uneven movement. |
| Handle design | Supports steady pressure | Confirm that fingers fit comfortably and that the handle does not slip easily. |
| Surface finish | Important near the eye area | Inspect for smooth edges, clean plating or finish, and no sharp burrs. |
| Packaging protection | Helps prevent deformation during transport | Review how the tool and replacement pads, if included, are secured. |
For custom sourcing discussions, it is also useful to define the intended sales channel, target user, preferred finish, packaging style and quality inspection expectations before you send an inquiry. Clear requirements make product comparison more accurate.
How to Use an Eyelash Curler Without Creasing Lashes
Technique matters as much as tool design. Even a well-made curler can create a harsh bend if it is squeezed too firmly or placed at the wrong angle. A simple, controlled method is usually best:
- Start with clean, dry lashes before mascara.
- Open the curler fully and look slightly downward into a mirror.
- Position the pad close to the lash base without catching the eyelid.
- Close gently and hold for a few seconds rather than applying sudden force.
- Release fully before moving the tool; do not pull while closed.
- For a softer curve, repeat lightly at the middle of the lashes, then near the tips.
- Apply mascara after curling if desired.
If pinching occurs, stop and reposition. Pinching can mean the frame curve is not suitable, the tool is too close to the lid, or the user is closing the clamp at an awkward angle. If lashes look sharply bent, reduce pressure and avoid holding the clamp in one spot for too long.
Cleaning, Pad Replacement and Storage
An eyelash curler touches the eye area, so hygiene is not optional. Residue from mascara, skincare or natural oils can build up on the pad and frame. This buildup can reduce grip, make the tool feel sticky, and increase the chance of pulling lashes.
After use, wipe the pad and frame with a soft cloth. If makeup residue remains, use a suitable gentle cleaning method and allow the tool to dry completely before storage. Avoid soaking parts unless the product instructions clearly allow it, because moisture trapped around hinges can affect movement over time.
The pad should be checked regularly. Replace it when it becomes deeply grooved, cracked, hardened, loose or uneven. A pad that no longer rebounds properly can press lashes against the metal edge, creating a crimped shape or damaging delicate lashes. Store the curler in a clean, dry place where the frame will not be bent by heavier items in a makeup bag.
Buyer Questions for Sourcing and Product Development
For brands, distributors and beauty retailers, eyelash curler sourcing should include more than a surface-level sample review. A sample may look acceptable in photos but still fail in hand feel, alignment or packaging durability. Before choosing a supplier or confirming a purchase, prepare a practical review list.
- Is the frame alignment consistent when the curler closes?
- Does the pad sit evenly in the channel without shifting?
- Are the edges smooth around the clamp and handle?
- Does the hinge move evenly after repeated opening and closing?
- Is the handle comfortable for different hand sizes?
- Does the finish resist visible defects during normal handling?
- Are product instructions clear for safe use and cleaning?
- Is the packaging strong enough to protect the curved frame in transit?
Olimor Beauty supports buyers looking at practical tool categories and related product collections. If you are comparing eyelash curlers with other cosmetic tools, keep the focus on user safety, repeatable function and clear presentation rather than decorative features alone.
When a Different Lash Tool May Be Better
A classic clamp-style eyelash curler is useful for many routines, but it is not the only option for every user. People with very sensitive eyelids, lash extensions, recent eye irritation or medical eye concerns should be cautious with any tool used close to the eye. Lash extensions in particular may require advice from a lash technician, because clamping can affect the adhesive bond or extension shape.
For users who dislike clamp pressure, a heated lash tool may be considered where available, but it should be evaluated carefully for heat level, instructions and safety design. For retail buyers, offering clear product guidance can reduce misuse and improve customer satisfaction.
Final Selection Advice
A reliable eyelash curler should feel controlled, smooth and predictable. Look for a well-aligned curved frame, a comfortable handle, a resilient pad and clean movement at the hinge. Stainless steel construction, silicone pads, ergonomic shaping, spring-assisted release or heated options can all be valuable depending on the product design, but each feature should serve a real purpose for the user.
If you are choosing a tool for daily makeup, test fit and comfort first. If you are sourcing for a brand or retail line, compare samples with a checklist and review packaging, consistency and user instructions. For product questions or sourcing support, you can contact Olimor to discuss the type of eyelash curler that best fits your market and customer needs.
Tag: