Beauty Tools for Beauty Schools: How to Choose Manicure and Pedicure Training Kits
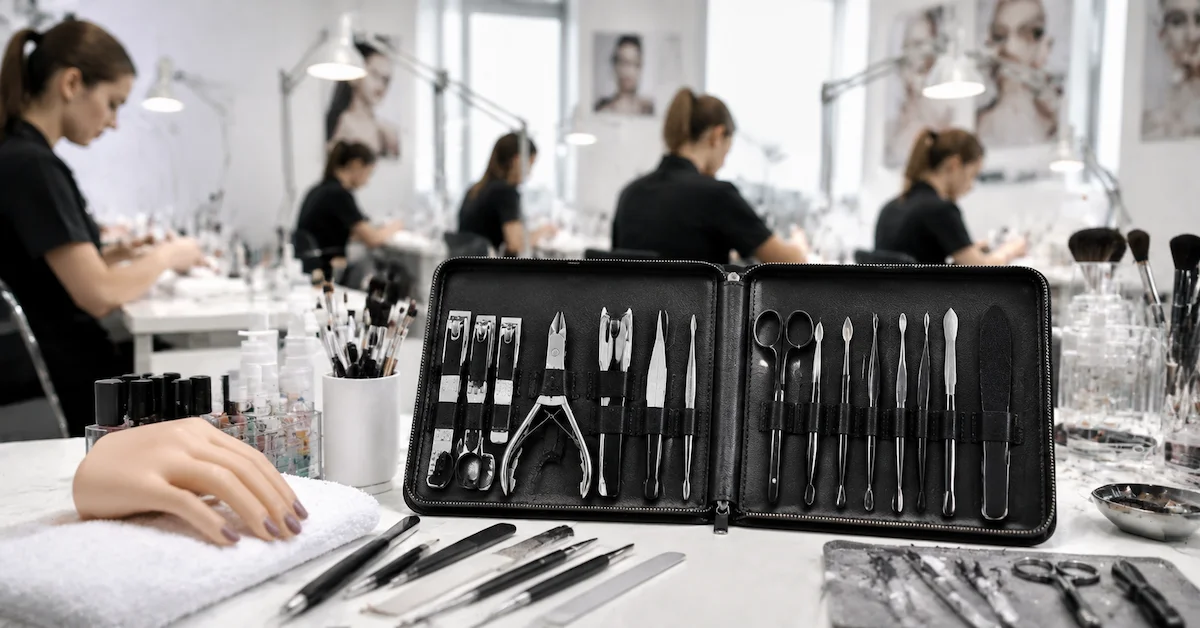
Beauty schools need manicure and pedicure kits that are easy to teach with, easy to inspect and practical for repeated student handling. The best kit is not always the largest or most decorative one. For training use, a balanced tool assortment, secure case layout, consistent finish and clear supplier documentation usually matter more than extra accessories.
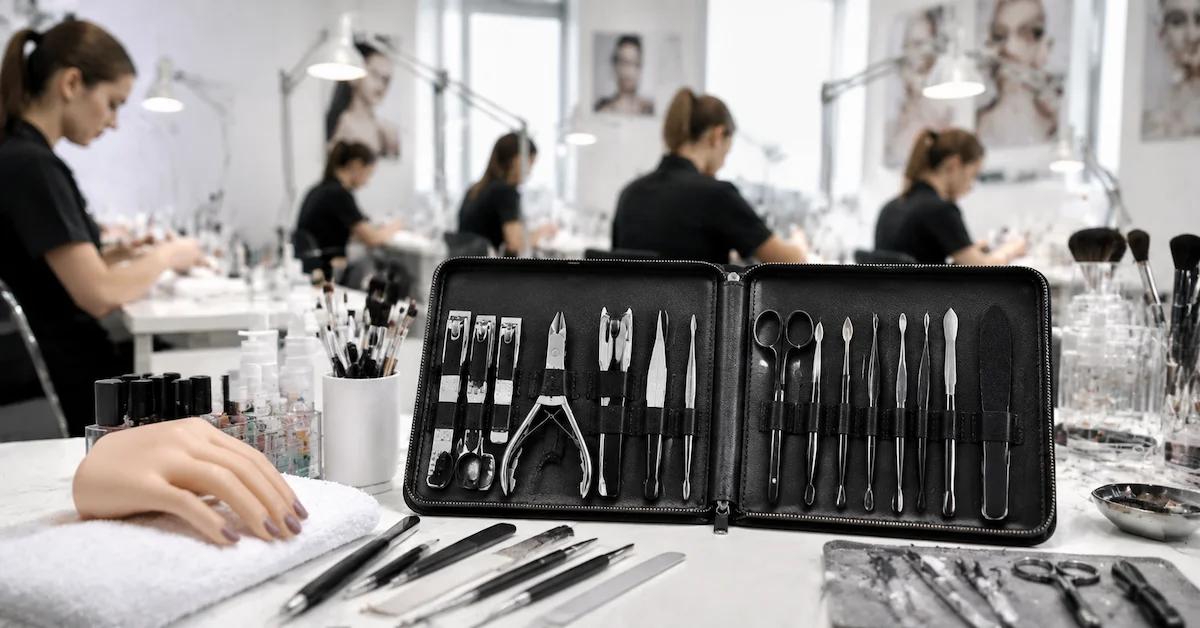
This guide explains how program directors, instructors and purchasing teams can evaluate beauty tools for beauty schools before ordering student kits, classroom sets or demonstration kits. It focuses on compact manicure and pedicure hand-tool kits like the zippered organizer style shown in many training assortments, where metal implements are held in fixed elastic slots inside a clamshell case.
What Makes a Beauty School Tool Kit Different from a Retail Kit?
A retail grooming kit is usually purchased for personal convenience. A beauty school kit has a different purpose: it supports instruction. Students use the tools to learn hand positioning, trimming control, cuticle care, preparation steps, hygiene routines, safe storage and professional workflow. That means the kit must function as a learning system, not just a collection of items.
In a classroom or nail lab, instructors need tools that can be named, demonstrated, returned to place and checked quickly. If every item is loose in a pouch, students spend time searching instead of practicing. If the case does not hold tools securely, missing pieces become a recurring inventory problem. If cutting edges, hinges or tips vary widely from one kit to another, the instructor may have to compensate for tool inconsistency during demonstrations.
A training-ready kit should therefore do three things well. First, it should include the basic tools needed for the curriculum. Second, it should organize those tools in a repeatable way. Third, it should be simple enough for beginners to understand while still useful for practical manicure and pedicure exercises.
Core Tools a Manicure and Pedicure Training Kit Should Cover
Most beauty school manicure and pedicure kits are built around a few core tasks: trimming, shaping, cuticle work, cleaning and finishing. The visible kit type described here is a compact assortment in a black zippered, synthetic-leather style case with elastic retention loops. Most tools appear to be metal with a silver polished or brushed appearance. The visible assortment includes nail clippers, cuticle nippers, pliers-style nippers, tweezers, scissors, spatula or pusher-style tools, and files or buffers.
For schools, the value is not only the number of pieces. It is whether each piece supports a teachable step. Nail clippers are used for controlled trimming. Cuticle nippers and pliers-style tools help students understand finer cutting tasks and tool angle. Tweezers and scissors support preparation and detail work. Pusher or spatula-style implements help teach nail plate preparation and cuticle area handling. Files or buffers introduce shaping and finishing techniques.
Program directors should avoid choosing a kit simply because it looks complete. A beginner kit should not overwhelm students with too many similar tools. An advanced or clinic-use kit may need more specialization, but the starter set should make the purpose of each implement clear. Instructors can then build habits around proper selection, controlled use and return-to-case discipline.
Quick Comparison: What Buyers Should Check
The table below summarizes practical buying criteria for cosmetology school tools. It can be used when comparing samples from different suppliers or when reviewing a new student kit format.
| Evaluation Area | What to Look For | Why It Matters in School Use |
|---|---|---|
| Tool mix | Core manicure and pedicure implements such as clippers, nippers, tweezers, scissors, pushers and files or buffers | Supports trimming, shaping, cuticle care, cleaning and finishing without unnecessary complexity |
| Case design | Zippered clamshell case with fixed slots or elastic loops | Keeps tools organized, portable and easier to inventory after class |
| Tool fit | Each item should sit securely but be easy for students to remove and return | Reduces lost tools, delays and damage from loose storage |
| Finish consistency | Uniform surfaces, no obvious burrs, rough joints or visibly uneven edges | Helps prevent handling problems and supports professional training habits |
| Hinge and alignment | Nippers, clippers and scissors should open and close cleanly | Students learn better when tool response is predictable |
| Supplier details | Tool list, material information, packaging options and replacement availability | Allows schools to compare quotations accurately and plan replenishment |
| Cleaning compatibility | Supplier guidance on cleaning, disinfection and care methods | Important for school hygiene procedures and tool longevity |
Why the Case Is More Important Than Many Buyers Expect
The case is not only packaging. In a school environment, it is part of the training workflow. A good case encourages students to keep tools separated, protects tips and cutting edges during transport, and makes it obvious when an item is missing. The clamshell format is especially useful because it opens flat, allowing the full set to be visible during demonstrations.
When a teacher introduces a tool, students can locate the same item in the same position. When the practical session ends, the instructor can scan the open case quickly. This reduces confusion in classes with many students and supports a professional habit: every implement has a place, and every tool should return to that place after use and cleaning.
For students who carry their own kits between home practice, classroom instruction and lab sessions, portability also matters. A compact zippered case is easier to manage than a loose tray or open pouch. For schools that keep kits in cabinets, the case still helps with bin storage, check-in and check-out control. In both situations, the case contributes to tool life by limiting unnecessary contact between metal pieces.
How to Inspect Beauty School Tools Before Buying in Quantity
Sampling is one of the most useful steps a school can take before placing a larger order. Product photos can show layout and general appearance, but they cannot confirm how the tools feel in the hand, how securely they fit the case or whether the assortment suits the syllabus. A sample review should involve both purchasing staff and instructors whenever possible.
Physical inspection checklist
- Open the case flat: Check whether all tools are visible and logically arranged for instruction.
- Remove and return each item: Confirm that the elastic slots hold tools securely without making them difficult for students to access.
- Check cutting tools: Open and close clippers, nippers and scissors. Look for smooth movement, reasonable alignment and no obvious looseness.
- Inspect surfaces: Look for rough edges, burrs, uneven finish or visible contamination from manufacturing or packing.
- Review tool duplication: Make sure similar-looking implements have clear roles in the lesson plan.
- Evaluate case construction: Test the zipper, stitching, corners and interior retention loops for practical classroom handling.
- Ask about documentation: Request the complete tool list, material descriptions, packing method and care guidance.
For programs that have formal sanitation procedures, cleaning and disinfection compatibility should be discussed before purchase. Requirements can vary by location and school policy. In the United States, state boards of cosmetology and public health authorities may provide sanitation rules for schools and salons. Buyers can also reference recognized bodies such as the U.S. Food and Drug Administration for general information on cosmetic and personal-care regulation, where relevant. Always verify current versions of applicable rules and request supplier documents rather than assuming a tool set meets a particular requirement.
Matching the Kit to the Course Level
The right kit depends on how it will be used. A first-term student, an advanced nail technology student and an instructor demonstration kit may not need the same assortment. Before requesting a quotation, schools should define the role of the kit in the curriculum.
Starter student kits
For beginners, clarity is the main priority. Students should be able to identify each implement and understand its basic purpose. A compact manicure and pedicure set with clippers, nippers, tweezers, scissors, pushers and finishing tools can be useful because it covers the core workflow without requiring a large rolling case or many specialty accessories.
Classroom demonstration kits
For instructor use, the layout should be highly visible and repeatable. A flat-opening case makes it easier to point to a tool during explanation. If multiple instructors teach the same course, standardized kits reduce confusion and help keep lesson plans consistent across classes.
Clinic or high-frequency practice kits
For programs where students practice heavily under supervision, buyers may give more weight to hinge feel, cutting alignment, replaceability and ease of cleaning. A visually attractive kit is not enough. Schools should ask whether components can be replenished and whether the supplier can maintain the same or similar configuration for future cohorts.
Cost Factors Beyond the Unit Price
Price matters, but the lowest unit cost does not always result in the lowest total cost for a school. A poorly organized kit can create hidden expenses through lost tools, instructor time, replacement purchases and student frustration. When comparing quotations, buyers should consider the full use cycle.
Important cost factors include the number of tools in the kit, case construction, metal finishing, packaging, customization requirements, sample costs, shipping method and replacement planning. If the school needs logo printing, special packaging, a modified tool assortment or labeling by course level, those details should be discussed early. Customization may affect cost and schedule, and the supplier should confirm what is feasible before production or procurement begins.
Consistency is another cost factor. If a program orders kits every term, changing layouts may require instructors to adjust teaching materials or students to work from different case arrangements. A supplier that can communicate clearly about available tool lists and future replenishment may be more useful than one offering an attractive one-time deal.
Common Sourcing Mistakes to Avoid
One common mistake is buying the largest kit available. More pieces can look impressive, but too many tools may confuse beginners and slow down demonstrations. A better approach is to choose a kit that fits the learning objectives and add specialized tools only when the curriculum requires them.
Another mistake is judging only by shine. A polished surface can make a kit look professional, but appearance alone does not confirm tool alignment, edge quality, durability or cleaning compatibility. Buyers should inspect samples and request specifications where they matter.
Schools also sometimes overlook standardization. If one cohort receives a different kit layout from another, instructors spend extra time explaining tool positions and substitutions. Standardized case organization supports smoother lesson delivery, easier inventory checks and more predictable student practice.
Finally, some purchasing teams wait too long to ask about replacement parts or reorder availability. Student kits are handled frequently, and loss or wear is realistic. Before ordering, ask whether the supplier can provide the same kit again, whether individual components are available, and how changes in tool assortment will be communicated.
Supplier Evaluation Questions for Schools and Distributors
For B2B buyers, the supplier relationship is as important as the product photo. Whether purchasing for a single campus, a group of schools or a distributor channel, ask direct questions before committing to a volume order.
- Can the supplier provide a complete list of tools included in the kit?
- What material and finish information is available for the metal tools and case?
- Can the tool assortment or case presentation be customized for a school program?
- How are tools packed to reduce movement and damage during shipping?
- What inspection steps are used before shipment?
- Are sample units available for instructor evaluation?
- Can the supplier support repeat orders or replacement needs?
- What cleaning, care or storage guidance can be provided?
Olimor supplies beauty tools and related product options for buyers who need organized sourcing support. Schools and distributors can review broader categories through the beauty tool product range or browse available groupings in the product collection. For a specific manicure and pedicure training kit, the most useful first request is a clear tool list, case details and any customization requirements.
Maintenance and Classroom Handling Guidance
Even a well-selected kit needs proper handling. Instructors should teach students to clean tools according to school policy and applicable local requirements, dry tools before storage where appropriate, and return each implement to its slot after use. Tools should not be left loose in bags, drawers or wet areas, because uncontrolled storage can damage edges and create hygiene concerns.
Schools should create a simple check-in routine. At the beginning of class, students open the case and confirm that each item is present. At the end, tools are cleaned according to the school procedure, dried if required, and returned to the same position. This habit helps students prepare for salon environments where organization, safety and accountability are part of professional practice.
Because sterilization and disinfection requirements may differ by region and setting, do not rely on assumptions. Verify the current guidance from the relevant cosmetology board, health department or other applicable public authority, and ask the supplier for care instructions and material information. No buyer should assume that every metal tool in every kit can tolerate every cleaning method.
When This Type of Kit Is a Good Fit
A compact manicure and pedicure tool kit in a zippered organizer case is a good fit for many beauty school situations. It is especially useful for introductory nail care instruction, student starter kits, portable demonstration sets and programs that want a consistent layout across classes. Its strength is organization: students can see the full assortment, learn each tool function and practice returning items to their proper place.
This type of kit may be less suitable when a program requires highly specialized professional tools, confirmed material grades or documented compatibility with a specific disinfection process. In those cases, the school should request detailed specifications and evaluate samples against its own requirements before ordering.
For buyers who are ready to compare options, Olimor can discuss tool assortment, packaging and sourcing details. Send your requirements through the product inquiry form or reach the team via contact us with course level, intended use and any customization needs.
FAQ: Beauty School Tool Kit Purchasing
Can schools request samples before placing a larger order?
Yes, sample evaluation is a sensible step for training kits. It allows instructors to check tool layout, handling, case function and suitability for the curriculum before a larger purchase decision.
Is there a fixed MOQ for beauty school manicure kits?
MOQ can depend on the product configuration, packaging and customization requirements. Buyers should confirm current terms directly with the supplier before planning a school-wide rollout.
Can the tool assortment or case be customized?
Customization may be possible depending on the requested tools, case format, packaging and order requirements. Provide the desired tool list, logo or labeling needs early so the supplier can confirm feasibility.
How should schools evaluate quality before approval?
Inspect sample units for secure case fit, smooth hinges, aligned cutting tools, consistent finish, clear tool functions and available supplier documentation. Instructor feedback should be part of the approval process.
What affects lead time for training kit orders?
Lead time can be influenced by stock availability, customization, packaging, order quantity and shipping arrangements. Confirm the current schedule with the supplier when requesting a quotation.
Tag: