

Eyelash Curler Safety Guide for Users, Salons and Beauty-Tool Buyers
An eyelash curler should lift lashes cleanly without pinching skin, pulling hairs or creating a sharp crease. The safest results come from three things working together: clean, dry lashes; a controlled curling technique; and a well-aligned tool with a resilient pad. This guide explains how to use an eyelash curler safely, how to compare designs, how to maintain the pad and frame, and what retail or salon buyers should check before sourcing curlers for customers.
The topic is simple, but it matters because eyelash curlers work close to the eye. A comfortable curler can make daily makeup easier, while a poorly maintained or badly matched tool can cause discomfort and lash stress. Olimor Beauty offers beauty tools including eyelash curlers, and the Red Radiance Eyelash Curler is described with an ergonomic design, vibrant red finish, comfortable grip and playful smiley detail. Those features are useful only when combined with safe use, careful inspection and clear customer instructions.
Quick Answer: How to Use an Eyelash Curler Safely
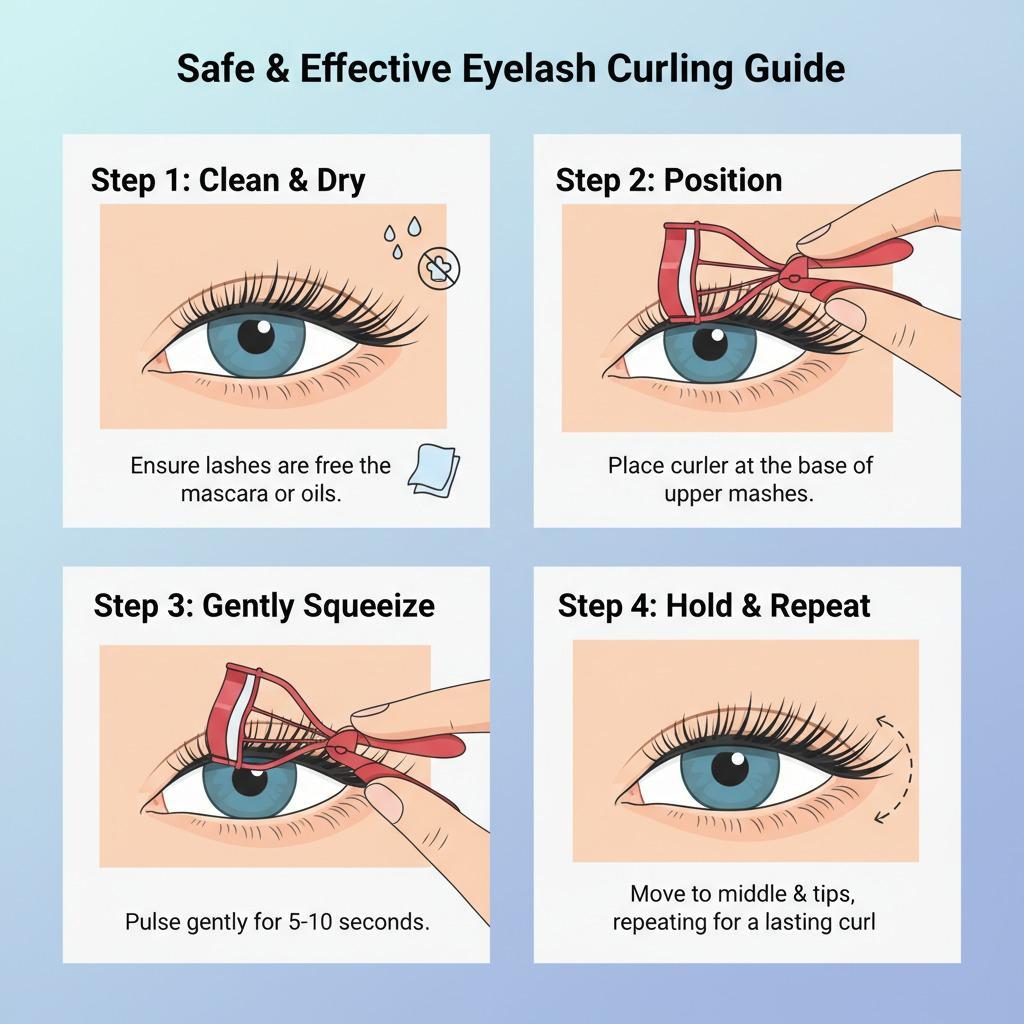
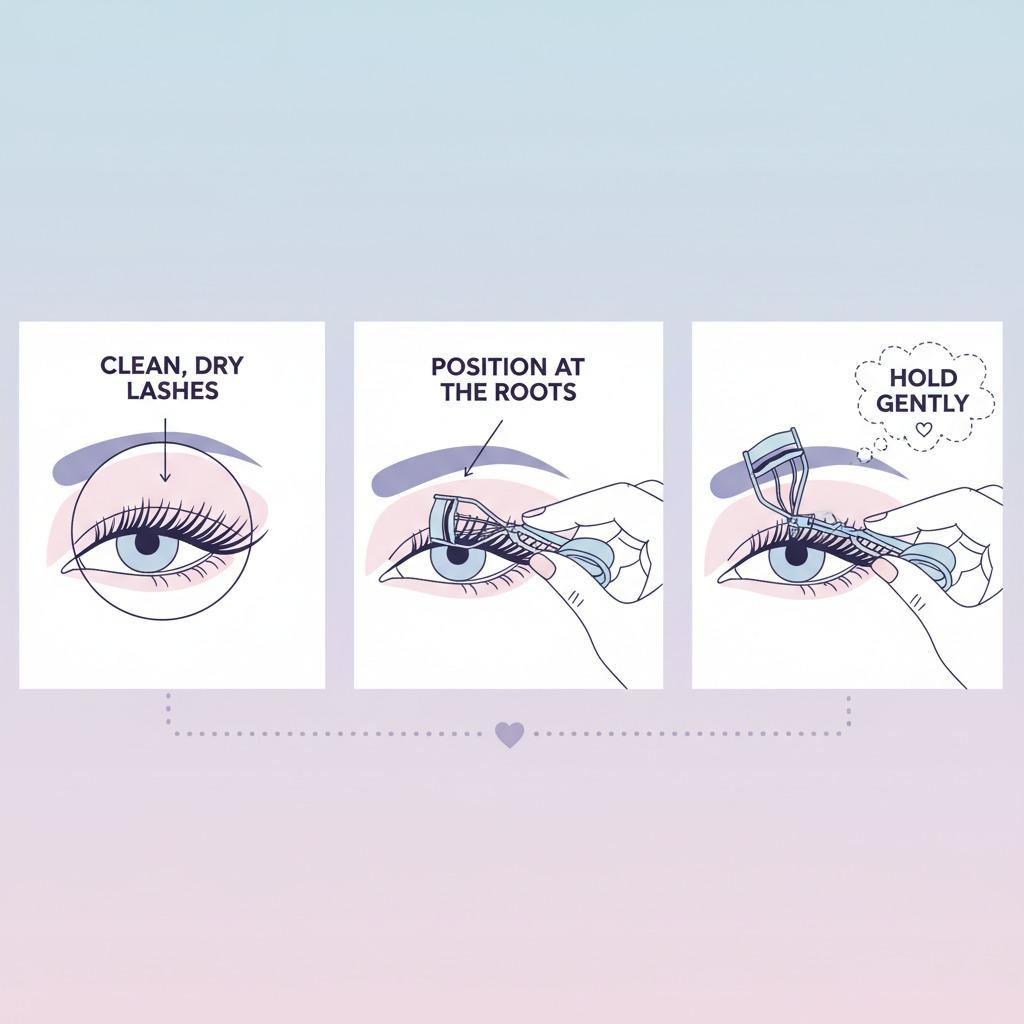
Use an eyelash curler before mascara, on clean and fully dry lashes. Open the curler completely, look slightly downward into a mirror, place the frame near the lash roots without catching eyelid skin, and close with light even pressure. Release before moving the tool. For a natural curl, press gently at the base, middle and near the tips instead of clamping hard in one spot.
Never pull the curler away from the face while it is closed. Do not use a curler when the pad is cracked, split, sticky, deeply grooved or loose in the channel. If the hinge feels unstable or the upper and lower parts do not meet evenly, replace the tool. Eye-area comfort is more important than forcing a stronger curl.
Start With Clean, Dry Lashes Before Mascara
The best time to curl lashes is after skincare has settled and before mascara is applied. Mascara can make lashes stiff and tacky. When a curler clamps over coated lashes, the hairs may stick to the pad or frame and become easier to pull or break when the tool opens. Curling over mascara can also form clumps and a square bend rather than a soft lifted shape.
Cleanliness is part of safe technique. Remove leftover eyeliner, mascara flakes, lash glue residue, oil and skincare residue around the lash line. If you have just washed your face, wait until the lashes are dry. Damp lashes may not hold shape evenly, and moisture can make the frame slip. Contact lens wearers should avoid pressing the tool into the eyelid and should follow their eye-care professional’s hygiene advice.
Skip curling if your eyes are red, swollen, infected, irritated or recovering from a cosmetic procedure. If you wear lash extensions, follow your lash technician’s instructions because mechanical curlers can affect extension placement or adhesive bonds. If you notice unusual lash shedding or repeated breakage, stop using the curler until you identify whether the issue is technique, pad condition or tool fit.
Step-by-Step Technique for a Smooth Lash Lift
A safe curl is built gradually. One hard squeeze at the base may create a visible crimp and unnecessary stress. Use good lighting, keep your hand steady and work slowly enough to feel whether the frame is placed correctly.
- Inspect the tool first. Check that the pad is seated in the channel, the hinge moves smoothly and no dried makeup is stuck near the clamp.
- Open the curler fully. A half-open frame is harder to position and more likely to catch skin.
- Look slightly downward. This exposes the lash line while keeping the eyelid relaxed.
- Place near the roots, not on skin. The frame should sit close to the base of the lashes without pinching the eyelid. If you feel skin caught, open immediately and reposition.
- Close with light pressure. Hold briefly. The motion should feel like a controlled press, not a pinch.
- Release before moving. Open the curler completely, shift slightly toward the middle of the lashes, then press again. Repeat near the tips if needed.
- Apply mascara afterward. A light coat can define the lifted shape without trapping lashes inside the tool.
Very straight, short or downward-pointing lashes may need several gentle presses, but they do not need excessive force. Thick lashes may benefit from holding the press slightly longer, while fine or sparse lashes should be curled with especially light pressure. The goal is a curved fan, not a folded lash line.
Pressure, Heat and Common Mistakes to Avoid
If a curler is aligned and the pad is in good condition, heavy force should not be necessary. Signs of too much pressure include a square crimp, eyelid discomfort, lashes stuck to the pad or hairs pulled out during release. If the result looks harsh, reduce pressure and curl in smaller sections along the lash length.
Some users warm a curler briefly with a hairdryer. Heat is optional and should be treated carefully. If warming the tool, test it against the inside of the wrist before bringing it near the eye. It should feel mildly warm, never hot. Do not heat a curler to compensate for a poor pad, weak alignment or unsuitable eye shape fit.
Common habits that increase lash damage risk
- Curling after mascara: Coated lashes may stick to the pad and break on release.
- Using a worn pad: A flattened or split pad cannot cushion lashes properly.
- Clamping and pulling: Always open the tool fully before moving it away from the eye.
- Rushing placement: A quick clamp near the eyelid can catch skin.
- Sharing without cleaning: Eye tools can transfer oils, makeup residue and microbes.
- Ignoring eye-shape fit: A frame curve that does not match the lash line may miss center lashes or pinch at the corners.
The U.S. Food and Drug Administration provides public safety information on eye cosmetics and eye-area hygiene, while consumer beauty tools sold in the European Union may fall under general product safety obligations such as the EU General Product Safety Regulation. Requirements can change, so buyers should verify current rules, market-specific obligations and supplier documents before purchasing or distributing tools.
How to Choose an Eyelash Curler That Fits Comfortably
A good eyelash curler is not only a decorative beauty item. It is a hand tool that must sit close to the eyelid, close evenly and cushion delicate hairs. When comparing models, focus first on fit, alignment, pad quality and handle control. Color and detail can support retail appeal, but comfort and consistency should guide the decision.
The Red Radiance Eyelash Curler from Olimor Beauty is described with an ergonomic design, a vibrant red finish, a comfortable grip and a smiley detail. For users, those handling features can make the tool easier to identify and hold. For buyers, they should be evaluated together with practical checks such as hinge movement, pad seating, frame finish and packaging instructions.
| Selection factor | What to check | Why it matters |
|---|---|---|
| Frame curve | Does it sit close to the lash line without pressing into the eyelid? | A better fit reduces pinching and missed lashes. |
| Pad condition | Is the pad smooth, resilient and properly seated? | The pad cushions lashes and helps prevent sharp bends. |
| Handle control | Does the grip feel stable and easy to close gradually? | Controlled pressure is safer than sudden clamping. |
| Hinge alignment | Do the upper and lower parts meet evenly across the pad? | Uneven pressure can crease or pull lashes. |
| Surface finish | Are eyelid-adjacent edges smooth and free from rough areas? | Smooth finishing supports comfort near the eye. |
| Instructions | Do packaging or inserts explain curling before mascara and safe release? | Clear directions reduce misuse and returns. |
For product comparison, review Olimor eyelash curler options and related beauty tool products. If you are building a retail set, salon kit or promotional line, compare how each tool feels in different hand sizes and whether the design suits the end user’s makeup habits.
Maintenance: Clean, Inspect and Store the Curler Properly
Because an eyelash curler touches the eye area, routine cleaning is essential. After each use, wipe the pad and frame with a clean tissue or soft cloth to remove oils, powder, mascara dust and skin residue. For a deeper clean, use a gentle cleanser or a small amount of alcohol on a cotton pad, then allow the tool to dry completely before storing. Avoid soaking areas where liquid can collect around the hinge or pad channel.
Inspect the pad frequently. Replace or stop using the pad if it becomes deeply grooved, cracked, split, brittle, sticky, loose or flattened. The replacement timing depends on use frequency, cleaning habits and pad condition, so visual and tactile inspection is more reliable than a universal schedule. A damaged pad can expose lashes to the hard channel underneath and create a sharper bend.
Storage also affects performance. Keep the curler in a dry area away from damp sink surfaces, loose powders and crowded makeup bags where the frame may be bent. If the curler becomes misaligned, does not open smoothly or feels unstable at the hinge, do not force it back into use near the eye.
B2B Buying Considerations for Retail, Salon and Private Label Projects
For commercial buyers, eyelash curlers should be evaluated as user-contact tools, not only as visual merchandise. A bright finish or playful detail can help shelf appeal, but customer satisfaction depends on safe handling, consistent inspection and clear instructions. Before placing a bulk order, request current product details directly from the supplier and evaluate samples under real handling conditions.
Supplier evaluation checklist
- Sample review: Test sample units for frame alignment, hinge movement, pad seating and comfort near the lash line.
- Batch consistency: Ask how the supplier checks surface finish, color appearance, logo placement if applicable and pad fit across production.
- Customization scope: Confirm what can be customized, such as color, packaging or branding, without assuming availability.
- Packaging clarity: Ensure instructions explain clean dry lashes, curling before mascara, light pressure and full release before moving.
- Replacement or spare pad plan: Ask whether pads are included or available and how they should be presented to customers.
- Market documentation: Request supplier documents relevant to your destination market and verify current regulatory expectations.
- After-sales communication: Confirm how the supplier handles quality questions, product photos, packaging files and reorder discussions.
Cost is usually affected by order quantity, customization, packaging complexity, finish requirements, inspection expectations and shipping arrangement. Avoid comparing quotations only by unit price. A low-cost curler that pinches, has inconsistent pad fit or lacks adequate instructions may create complaints, returns or brand damage. For tailored sourcing discussions, contact Olimor or send a product inquiry with your market, intended channel and packaging needs.
Troubleshooting: Why the Curl Looks Wrong or Feels Uncomfortable
If lashes look bent instead of curled, the most likely causes are too much pressure, clamping in only one place, curling after mascara or using a worn pad. Try curling clean lashes with several light presses from base to tips. If the bend remains sharp, inspect the pad and frame alignment.
If the curler pinches at the corners, the frame curve may not suit your eye shape or the tool may be positioned too close to the eyelid skin. Look downward, open the tool wider and place it more carefully. If discomfort continues, choose a different curler shape rather than adapting by force.
If lashes do not hold curl, check whether the lashes were damp or coated with skincare residue before curling. Thick or very straight lashes may need a longer gentle hold, but they should not be crushed. Applying mascara after curling can help define the lifted shape, but waterproof or heavy formulas should be removed carefully at the end of the day to avoid lash stress.
FAQ
Can I request samples before ordering eyelash curlers for retail or salon use?
Yes. Business buyers should request samples to review grip comfort, pad resilience, frame alignment, surface finish and packaging presentation before making a larger purchasing decision.
Does Olimor offer customization for eyelash curlers?
Customization may depend on the product style and project requirements. Buyers should confirm available options such as color, packaging or branding directly with Olimor before planning artwork or launch schedules.
What MOQ or lead time should I expect?
MOQ and lead time can vary by product, customization, packaging and order status. Ask for current details through an inquiry and avoid relying on assumptions from previous projects.
How should quality be checked before shipment?
Review sample approval, frame alignment, hinge function, pad seating, surface finish, color consistency, packaging accuracy and instruction clarity. Request supplier documents relevant to your market and verify current requirements.
When should an end user replace an eyelash curler pad?
Replace or stop using the pad when it is cracked, split, flattened, sticky, brittle, loose or deeply grooved. Frequent users should inspect the pad often because worn cushioning can cause harsh bends.
Safe Curling Depends on Technique, Fit and Inspection
An eyelash curler can be a simple, effective beauty tool when it is used with care. Curl before mascara, start with clean dry lashes, use light pressure and build the curl in small steps. Keep the pad clean, inspect it regularly and stop using any tool that feels misaligned or uncomfortable.
For users, the best curler is the one that fits the eye area and feels controlled in the hand. For salons, retailers and private label buyers, the best choice is a tool that combines visual appeal with practical comfort, consistent inspection and clear customer instructions. Careful selection protects the user experience and supports a more reliable beauty-tool offering.
Tag: